For a gap-free wattle fence, select consistent branch thickness (around 1.5 inches), perfect the alternating over-under weave pattern, and maintain even tension throughout. Start each row from opposite sides, overlap branches by 6-12 inches at junctions, and space stakes about 30 inches apart. Work in small horizontal sections of 3-4 rows, firmly press each new layer, and use thinner branches to fill emerging gaps. These fundamental techniques will transform your rustic barrier into a masterpiece.
10 Tips for Gap-Free Wattle Fence Weaving
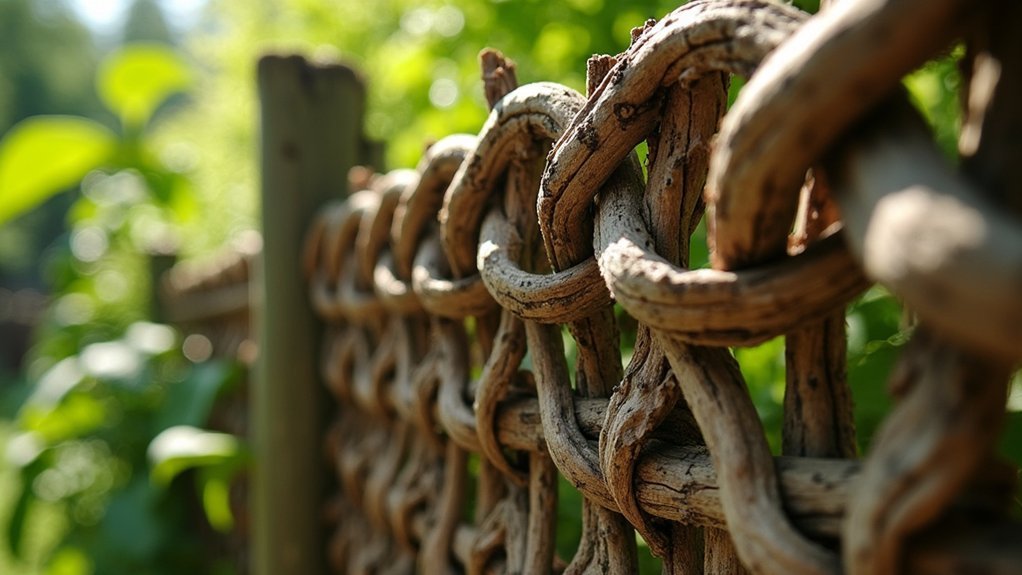
Creating a wattle fence without gaps requires careful attention to your weaving technique. Start with an alternating over-under pattern, beginning each new row on the opposite side of the previous branch to maintain tension throughout your fence.
Overlap your branches slightly as you weave to eliminate potential gaps and strengthen the structure. Press each row firmly against the previous one to compress the materials. Instead of tackling entire rows at once, focus on completing 3-4 rows in small sections for consistent tightness.
As you work, constantly check for emerging gaps and adjust branches above or below to close them. This ongoing correction prevents spaces from expanding as your fence grows. For problem areas with persistent gaps, soak particularly dry branches overnight in water to increase their pliability for weaving.
Select the Right Branch Thickness for Consistent Weaving
Beyond mastering weaving techniques, selecting branches of the right thickness forms the foundation of a gap-free wattle fence. Aim for branches around 1.5 inches in diameter—roughly thumb thickness—to achieve the perfect balance between flexibility and strength. Alternating the direction of green wattle material creates a more stable and tight weave pattern.
| Branch Diameter | Characteristics | Best Uses |
|---|---|---|
| 1-1.5 inches | Flexible, workable | Main weaving material |
| 1.5-2 inches | Balanced flexibility/strength | Longer sections |
| 2-3 inches | Rigid, sturdy | Stakes, supports |
| < 1 inch | Highly flexible, may sag | Fill-in, decorative |
| Mixed sizes | Creates gaps, uneven tension | Avoid for main structure |
You’ll need 15-20 branches per linear foot for a dense pattern. Soak thicker branches overnight to improve pliability. For 8-foot branches, space stakes about 30 inches apart to maintain proper tension.
Master the Alternating Weave Pattern
To master the alternating weave pattern, you’ll need to perfect the over-under technique where each branch goes behind one picket and in front of the next.
You must maintain consistent tension throughout your weaving by pressing each new row firmly onto the previous one, preventing gaps from forming.
Start each row from alternating sides of your fence to create a balanced structure that won’t sag or lean over time.
When selecting materials, flexible wood types like willow or hazel ensure the branches can bend easily around the stakes without breaking.
Over-Under Weaving Technique
The over-under weaving technique forms the backbone of any gap-free wattle fence. When executing this pattern, pass each branch alternately over one stake, then under the next, creating an interlocked structure that provides both strength and flexibility.
To perfect your over-under technique:
- Begin near ground level, positioning your first branch behind one stake and in front of the next to establish the pattern.
- Reverse direction at the end of each row, maintaining the alternating pattern while working back across.
- Compress woven branches regularly against the stakes to eliminate gaps and create a tight, cohesive fabric.
The consistent over-under method creates a versatile and quick weaving pattern that efficiently builds up your fence structure.
Remember to overlap branches by approximately one foot when adding new material, which locks layers together and reinforces the fence’s overall stability.
Maintain Consistent Tension
Mastering consistent tension throughout your weave represents the next level of wattle fence craftsmanship. As you work, press each new row firmly down onto the previous one, ensuring tight, even pressure across the entire section.
Complete small sections at a time rather than rushing through entire rows. This methodical approach helps maintain uniform tension and prevents future gaps. Periodically check your work by gently pressing against the weave – it should feel equally firm throughout.
When weaving corners, pay extra attention to reinforcement as these areas often loosen first. Overlap your branches slightly during installation to strengthen the structure and eliminate potential spaces. Using newly cut greenwood provides the flexibility needed to achieve tight corner weaves without breaking the branches.
If you notice any looseness developing, immediately adjust by tightening the surrounding weave. Remember to inspect your work regularly and make corrections while the fence is still in progress, not after completion.
Alternate Starting Sides
Alternating your starting side with each new row forms the backbone of a truly gap-free wattle fence. When you begin each new row from the opposite side of the previous one, you’ll distribute tension evenly throughout the structure, preventing weak points and unsightly gaps.
For perfect alternating weave patterns:
- Start your first row from the left, weaving branches in an over-under pattern until you reach the right side.
- Begin the second row from the right, continuing the over-under sequence but in reverse.
- Overlap branch ends slightly where they meet previous rows to eliminate gaps and create structural integrity.
This alternating technique creates a balanced fence with consistent width and tension. Use branches with flexible tips that can bend without breaking, making adjustments as you work to guarantee your fence remains tight and uniform. For optimal results, select thumb-thick branches that provide the perfect balance between flexibility and strength.
Maintain Proper Tension Throughout Your Fence

Proper tension serves as the backbone of any successful wattle fence, preventing unsightly gaps and ensuring structural integrity over time. As you weave, maintain consistent pressure on each branch while threading it through the stakes. Work in small sections of 3-4 rows between posts to better control tension and prevent loose areas.
| Tension Stage | Common Issue | Solution |
|---|---|---|
| Starting Base | Loose foundation | Use thicker branches at bottom |
| Middle Weaving | Uneven pressure | Alternate starting sides |
| Top Finishing | Loosening edges | Stop 4″ from stake tops |
Use stakes installed at regular intervals to support your weaving pattern. Press each new row firmly onto the previous one, and overlap branches slightly rather than butting them end-to-end. Regularly check your work by sight and touch to catch tension problems early.
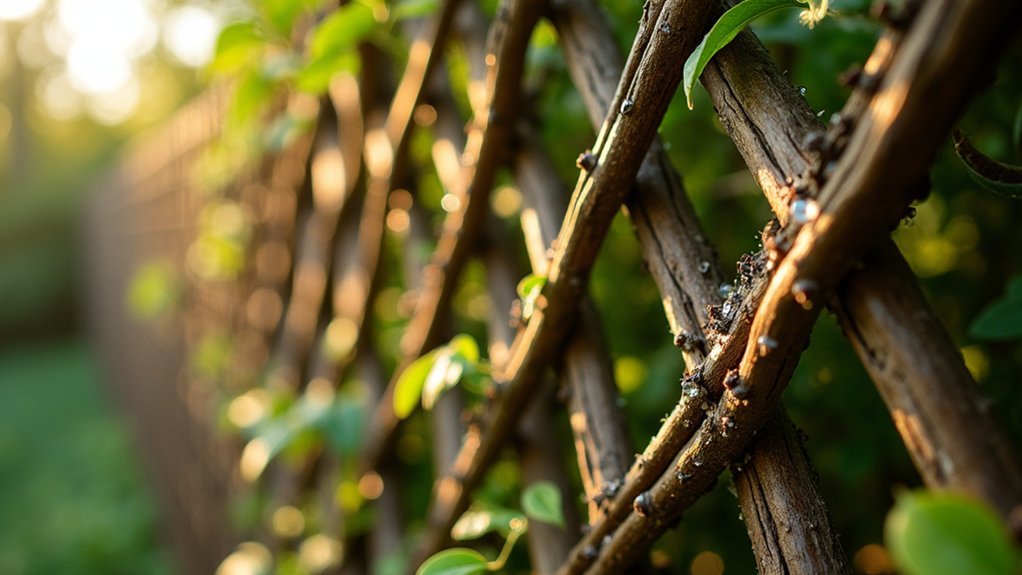
Create Seamless Branch Transitions
Creating seamless shifts between branches forms the heart of a gap-free wattle fence, as even small discontinuities can compromise both appearance and durability. Focus on proper preparation and strategic placement to achieve invisible connections.
When joining branches, cut thinner ends at angles and overlap them by 6-12 inches to maintain continuous weaving. Position these tapered ends behind stakes to hide connections and create a cleaner aesthetic.
- Use longer branches (6-8 feet) whenever possible to minimize mid-fence splicing.
- Match branch thickness with adjacent weavers for consistent fence density.
- Reserve straight, knot-free branches for connection zones where precise alignment matters.
For natural reinforcement at corners, incorporate fork-shaped branches to bridge junction gaps and strengthen these vulnerable areas.
Properly Prepare Your Materials Before Weaving

Material preparation lays the groundwork for your entire wattle fence project, determining whether you’ll struggle with gaps or enjoy seamless weaving. Start by selecting flexible green branches like willow or hazel with uniform thickness, and trim all side shoots for smoother weaving surfaces.
If using dried branches, soak them overnight to restore flexibility. Cut ends at 45-degree angles for easier insertion between stakes, and cull any brittle pieces that might break during compression.
For stakes, choose rot-resistant woods like cedar, sharpen their ends, and guarantee uniform height.
Before weaving, sort all materials by size, compact the soil around your stakes, and keep tools close by.
Remember to start with thicker branches at the base and pre-bend materials into gentle arcs to reduce springback.
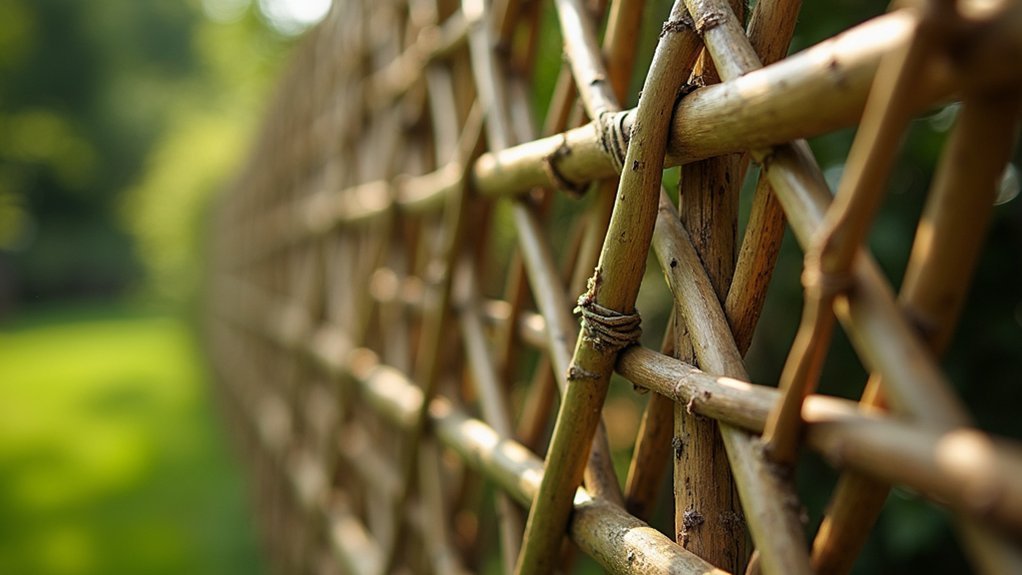
Position Stakes at the Optimal Distance
The foundation of a gap-free wattle fence begins with precisely positioned stakes, which form the backbone of your entire structure. For most gardens, place stakes 12-18 inches apart, allowing enough flexibility for weaving while maintaining proper tension.
When working with loose soil, reduce spacing to 8-12 inches to prevent sagging and shifting.
For ideal results:
- Use a string guide along your planned fence line to guarantee stakes are perfectly aligned
- Bury stakes one-third of their total height (16 inches deep for a 4-foot fence)
- Check each stake for plumb before you begin weaving
Remember to adjust your spacing for taller fences—anything over 4 feet tall requires stakes at 10-12 inch intervals to withstand wind pressure.
Work in Horizontal Layers for Even Coverage
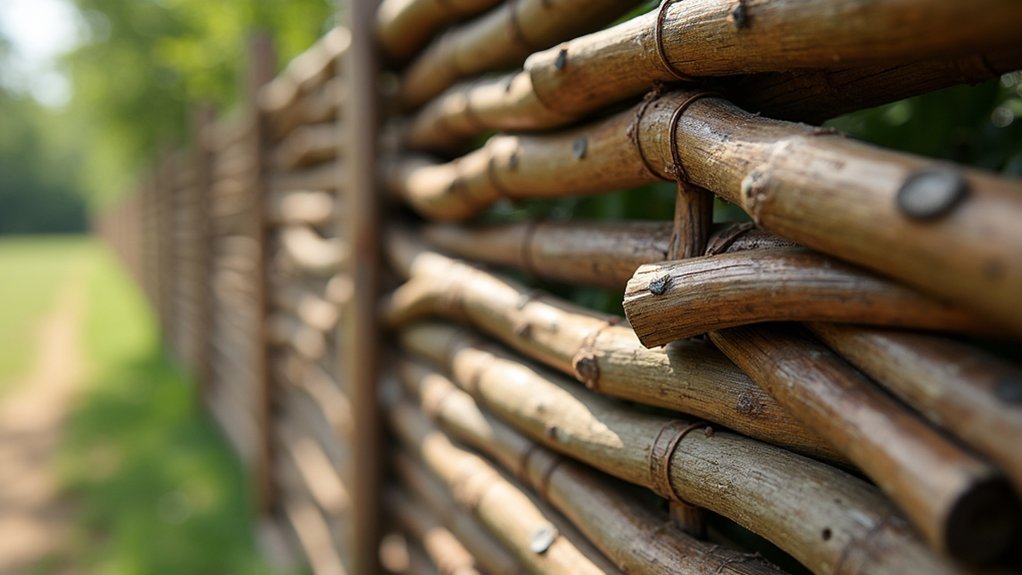
Building a gap-free wattle fence requires methodical layering, where each horizontal row interlocks seamlessly with the next. Start with thicker branches at the base, gradually shifting to smaller ones as you progress upward. Always overlap each layer slightly and maintain consistent tension by starting from alternating sides.
| Layer Technique | Purpose | Result |
|---|---|---|
| Slight overlap | Strengthens weave | Prevents gaps |
| Alternate starting sides | Distributes tension | Prevents bowing |
| Press layers firmly | Tightens structure | Creates stability |
As you work, continuously inspect for gaps and make adjustments by gently repositioning branches. Fill any openings with smaller sticks. Complete one section at a time, ensuring your over-under pattern remains consistent throughout. This methodical approach guarantees a tight, uniform fence that will maintain its structural integrity for years.
Use the Tamping Technique to Eliminate Gaps
After weaving each horizontal layer of branches, you’ll need to pack them tightly by firmly pressing down between the layers.
Strike each row downward with consistent pressure, using your palms or a gentle mallet to compact the woven material without causing damage.
This tamping action eliminates gaps and guarantees your wattle fence maintains its structural integrity while creating a uniform, aesthetically pleasing appearance. Continuing this front-to-back weaving pattern throughout the fence will significantly enhance its overall strength and durability.
Pack Between Layers
Creating a gap-free wattle fence requires mastering the essential tamping technique—a method where you compress each layer to eliminate spaces between woven branches. As you weave, focus on small sections at a time, completing three to four rows before moving to the next area to maintain consistent tension.
Use the right tools and materials to guarantee a tight, durable structure:
- Select appropriate materials – Use thick branches for base layers and flexible ones for subsequent layers to achieve a secure fit.
- Employ proper tamping tools – Gently tap new rows with a mallet or blunt hammer immediately after placing them.
- Maintain even tension – Start each new row from alternating sides to prevent warping, and overlap branches slightly for seamless integration.
Periodically inspect your work, making adjustments by shifting branches or adding material where needed.
Strike Rows Downward
Tamping woven rows with firm, deliberate downward pressure transforms a loose collection of branches into a seamless barrier. After weaving every 2-3 rows, press downward along the entire length to compact materials both horizontally and vertically.
Focus on finesse rather than brute force when tamping by hand—excessive pressure can warp your stakes or damage branches. Shift your hand position as you work to guarantee even compression across the entire weave.
Always tamp sequentially from bottom to top as you add new rows, maintaining consistent density throughout. Use this opportunity to adjust any misaligned branches that might create gaps later.
Look for overlaps or deviations and gently reposition them during the tamping process. This methodical compression technique eliminates spaces that would otherwise compromise your fence’s effectiveness. Using materials like freshly cut saplings ensures greater flexibility when weaving and tamping for a tighter, more durable structure.
Integrate Thinner Materials to Fill Emerging Spaces
While constructing your wattle fence, you’ll inevitably notice small gaps forming between the thicker branches. Don’t worry—these spaces are easily remedied with thinner, more flexible materials.
Select pliable branches that can be woven into existing spaces without disrupting your established pattern.
Focus on these three techniques for effective gap filling:
- Weave thinner branches where gaps appear, maintaining the same over-under pattern as your primary weave.
- Overlap materials slightly at junction points to prevent new gaps from forming as the fence settles.
- Work in small sections rather than attempting to fix the entire fence at once, ensuring consistent tension throughout.
Remember to distribute thinner materials evenly throughout your fence to maintain both structural integrity and a balanced aesthetic appearance.
Frequently Asked Questions
How Long Will a Wattle Fence Typically Last?
Your wattle fence will typically last 8-15 years, though it can reach up to 10 years with proper care. Weather conditions, construction quality, and regular maintenance will greatly impact its longevity.
Can Wattle Fencing Be Created in Curved or Circular Designs?
Yes, you can create curved or circular wattle fencing! Use freshly cut, flexible materials and position stakes closer together (16-18″ apart) along your curved line. Thinner wattles (under 1″ diameter) bend easiest around stakes.
Is Wattle Fencing Deer-Resistant?
Wattle fencing alone isn’t deer-resistant. You’ll need to modify it with greater height (7-8 feet), add fishing line across the top, or incorporate protruding branches to effectively deter jumping deer.
What Tools Are Essential for Professional-Looking Wattle Fence Construction?
To create professional wattle fences, you’ll need loppers, a hand saw, pruning shears, hammer, drill, level, measuring tape, and gloves. Don’t forget stakes and flexible branches for weaving your beautiful barrier.
Can I Use Bamboo Instead of Traditional Willow Branches?
Yes, you can use bamboo instead of willow. You’ll need to split thicker poles into strips for flexibility. Though stronger and more rot-resistant, bamboo creates a linear appearance compared to willow’s organic texture.
In Summary
You’ll find that wattle fence weaving becomes second nature with practice. When you’ve mastered these techniques, you’ll create beautiful, functional barriers that last for years. Remember to step back occasionally to spot potential gaps, and don’t rush the process. Your attention to detail makes all the difference between a fence that’s merely functional and one that’s truly exceptional—a reflection of traditional craftsmanship in your garden.
Leave a Reply